Let's Discuss
Enquire NowProtocol Buffers : Explained
Nov 22, 2021by, Anish S Ashok
Technology
Protocol Buffers (Protobuf) is a method of serializing structured data that can be transmitted over wire or be stored in files.
Before understanding the Protocol Buffer we can go through some of the general data types.
CSV( comma separated values )
A CSV comma-separated values file is a delimited text file that allows us to save data in a tabular format. As the name implies, CSV data format is basically a list of elements separated by commas. Normally CSV files are used to transfer data from one application to another.
Advantages of CSV
- Easy to read
- Easy to make sense of
Disadvantages of CSV
- The data types of elements have to be inferred and is not a guarantee
- Parsing become tricky when data contains commas
- Column names may or may not be there
Overall CSV files are shaky formatted; it may be good for data visualization but not for data transfer and storing.
Relational databases
Relational databases use a structure that allows us to identify and access data in relation to another piece of data in the database. Often, data in a relational database is organized into tables.
Advantages of Relational databases
- Data is fully typed
- Data fit in a table
Disadvantages of Relational databases
- Data is stored in a database, and data definition will be different for each database. So transferring data between two programming languages or databases will be difficult.
JSON format
JSON (JavaScript Object Notation) is a lightweight data-interchange format. The JSON format can be shared across the network very easily.
Advantages of JSON
- Data can take any forms (like arrays, nested elements)
- JSON is a widely accepted format on the web
- JSON can be read by pretty much any language
- JSON can be easily shared over a network
Disadvantages of JSON
- JSON has no schema enforcing
- JSON Objects can be quite big in size because of repeated keys
- JSON don’t have any comments, metadata, etc
Now we can talk about Protocol Buffers
Protocol buffers usually referred to as Protobuf, is a protocol developed by Google to allow serialization and deserialization of structured data.
Protobuf is mainly used for developing programs to communicate with each other over a network or for storing data.
Google focused on making it simpler, smaller, faster, and more maintainable than XML.
A developer can define how he wants his data to be structured. Once the data is structured with the help of special generated source code he can easily write and read structured data to and from a variety of data streams by using a variety of languages.
Advantages of Protocol buffer
- Data is fully typed
- Data is compressed automatically (less CPU usage)
- Schema (defined using .proto file) is needed to generate code and read the data
- Documentation can be embedded in the schema
- Data can be read across any language (C#, Java, Go, Python, JavaScript, etc…)
- 3-10x smaller and 20-100x faster than XML
- Code is generated automatically
Disadvantages of Protocol buffer
- Protocol buffer support for some languages might be lacking
- Can’t open the serialized data with a text editor (because it’s compressed and serialized)
How Protocol buffer used to share data across languages
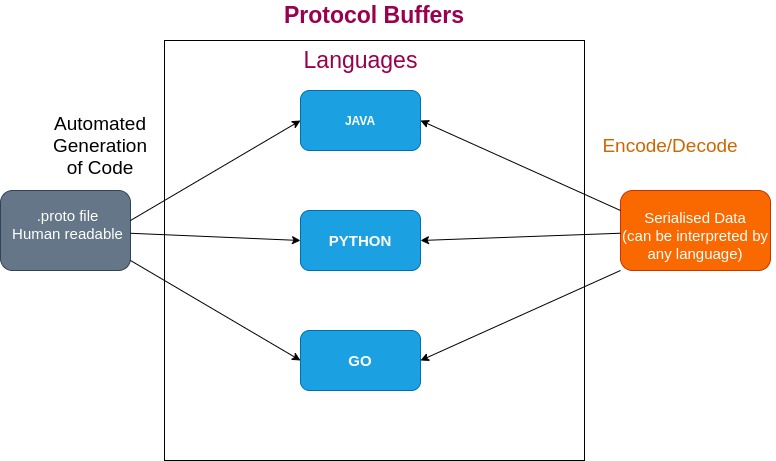
Data sharing across languages will start with a .proto file which is human readable.
Example:
syntax = “proto3”

message Person {

  required string name = 1;

  required int32 id = 2;

  optional string email = 3;

}
From this .proto file, a developer can generate code automatically to any language which he wants like Java, Golang, Python, etc…
Next using these programming languages, developers can create objects or data. Then they can serialize the data by encoding it. The advantage of this serialized data is it can be read by any language by decoding it.
Structure of Protocol buffer file
fileName : example.proto

data in file:

syntax = “proto3”

message MyMessage {

     string first_name = 2;

     bool is_validate = 3;

}
Now we can go through each line of the structure of protobuf
syntax = “proto3”
- This means we are using proto3 (version of protobuf) in this project. Every .proto file will start with this syntax.
message MyMessage {
- In the protocol buffer, we define messages. Because messages are what gets exchanged in the code.
Inside the message, we have some fields like ‘ int32 id =1; ‘
- Each field in our message has a Field Type (like int32, string bool, etc ..)
- Next, each field will have a field name (like id, name, first_name, etc …)
- Next for each field, we will have a Field Tag it will be a number. The tags are very important in protobuf.
- The smallest tag we can use is 1 and the largest tag is 229 -1 ie 536,870,91
Why share data across different programming languages?
Today’s trend is to build microservices, and these microservices can be built in different languages. And in a software system, we will be having a bunch of microservices that need to communicate with each other. In this type of scenario, we need to share data across different programming languages.
The procedure of sharing data with Protocol buffer
- Define data format in the .proto file
- The first step of creating a Protocol buffer is defining the object structure. This can be done by defining object structure in the .proto file.
- Compile Protocol Buffers schema
- After creating a .proto file the second step is to generate the classes needed to read and write the Protobuf messages. This can be done with the help of Protocol Buffers Compiler (protoc).
- Protocol Buffers Compiler can be downloaded from the official GitHub-Repository of protobuff https://github.com/protocolbuffers/protobuf/releases/
- After installing Protocol Buffers Compiler (protoc) we can compile our .proto file and generate the required language class (source code). This will help in reading and writing protobuf data.
- Each language have there owned commands to compile .proto file
- For example, to generate Golang source code we can use the command
○ protoc -I=$SRC_DIR --go_out=$DST_DIR $SRC_DIR/sample.proto
SRC_DIR is the placeholder of the source directory which contains the code of your program
DST_DIR is the placeholder of the destination directory in which the generated code is to be stored
SRC_DIR/sample.proto is the path to the .proto file.
We are using –go_out since we need to get golang source code. If we need JAVA source code we can use –java_out instead of this.
This will give you a language-specific class based on our schema. If our proto schema is an example.proto then golang will give us example.pb.go, java will create example.java, the dart will generate example.pb.dart etc. With the help of this newly created source code, we could create new objects for our message and byte code for that. This byte code can be sent through the network. In the receiver part, we can decrypt this bytecode with the help of the source code file in the destination.
Have a project in mind that includes complex tech stacks? We can be just what you’re looking for! Connect with us here.
Disclaimer: The opinions expressed in this article are those of the author(s) and do not necessarily reflect the positions of Dexlock.


